Saturday, 29 December 2012

Sugar Rush!

Well this is nearly the end of the year, so time for just one more blog post...

Just before Christmas, I thought I was pretty much beaded out, from making gifts and items for fairs...Then Nancy Dale produced a Christmas Cracker of a tutorial for an embroidered/freeform cuff, and I couldn't resist! Immediately the pdf landed in my inbox, I was mixing soup and selecting focals, I chose a lovely piece of etched dichroic glass which looked like opal, by Silvermoonlyn as the central item and this is the soup mix:


I also had a couple of vintage glass square cabs with an opal effect so they became the secondary focals, and I began by fixing them to some of Nicole's bead backing in pink. The bead embroidery extends a little way, to allow the anchoring of freeform.


Bezelling the squares was a bit tricky and I fudged the first one, but the second worked better and I got everything connected. I then raced away with the freeforming, and by Christmas Eve I was finished (although I might add more dimension later).

I named the piece 'Kingdom of Sweets' after the fantasy land in the Nutcracker ballet, the colours were sugary pinks and lilacs for the most part with the odd accent in copper and orange. I was pleased with the overall shape which is reminiscent of a wrapped candy or a cracker, all consistent with the confectionery theme.
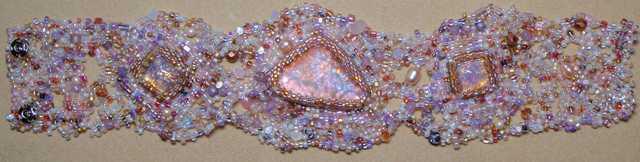

 I recommend the 'Atlantis Cuff' tutorial to anyone who would like to try freeform peyote/RAW. It was a lot of fun to make, and although every piece will be different, there is plenty of guidance and support to help you achieve a satisfying end result!

Thank you for reading and commenting over the last year! Hoping you all have a happy and healthy new year 2013!


Sunday, 9 December 2012

Beading-it-forward

So sorry for neglecting you all this month (and last) I thought I'd just update you on some beady happenings, so you won't worry that I have given up...

I have been making squares for the Bead&Button magazine Bead-it-Forward appeal in aid of breast cancer research. Having had a scare earlier in the year, and knowing several families affected by the disease I was keen to join in and in a fit of enthusiasm cut about 25 squares of beading foundation to the prescribed size. Of course I didn't manage to complete 25 squares, but through the OTTBS facebook group effort I passed on the spare cut squares to other beaders who didn't have the foundation.

We had made contact with the associate-editor in charge of the project and she had said that provided all squares were submitted together they could be combined into a single quilt so that the group's efforts could be auctioned as one! At the present time we have over 80 squares between us. I have just sent off the 12 I have managed (not all perfect in my eyes, but all good experiments) to our coordinator in the US Janine,  and we hope to collect all our groups' together by January, although the deadline is not until March.

I have been so impressed by the effort put in by inexperienced novice beaders and experts alike, and would like to encourage every beader to have a go! In order to help with inspiration, there are a number of free charts on the magazine page.

Anyway here is my 'set' all together


Otherwise, most of my bead efforts need to stay 'under wraps' until the recipients see them, being either gifts or 'Round Robin' embroidery projects, which will be revealed only when every square in the group has completed the circuit. Our group has participants in the US, UK and Australia, so it is likely to take a while... I'm on my 3rd square now, but will need to work on two others in the future, as they appear in the post!

Tuesday, 6 November 2012

OTTBS Bead Book Bounce: Little Bead Boxes by Julia S. Pretl

The third OTTBS Bead Book Bounce (and the second in which I've participated) features Julia S. Pretl's Little Bead Boxes. I bought this book after seeing the dedication in Diane Fitzgerald's Shaped Beadwork, but other than looking at the pictures had barely touched it. I decided to attempt at least one of the projects in the book, and possibly more if I could for Christmas presents for close family this year.

Although the book patterns begin with a triangular box, the one I really liked was 'Star' which is pentagonal.

I had no real problems with the base of the box, working in 4 colours of delicas, and following the word chart and the graphed design. It may seem odd to some that the word chart always starts at a corner, when due to stepping up, the point at which you actually begin a row varies, but once you are used to it it seems straightforward enough. The increase cycle section for pentagonal bases helps to clarify so is worth sticking a marker in.


My shaping at the top of the box was also trouble free, but I hit a snag at the hem round one (and I really needed the bookmark in the hem instruction page) I managed to break a bead in the corner of the row from which the hem begins so had to unravel right back to the beginning of the inner column. The 6lb fireline ended up like frayed Nymo!


My top tip here is to cut the thread if you are going to unpick more than a side, fasten it off and begin a fresh thread length from the problem point. Switching to a thinner needle and 4lb test for the 4 hem rows and the last two body rows and the zipping up, was also beneficial, although by the time I did the lid hem, I was comfortable with 6lb and a size 10 needle.

The box took me about a week to make so the prospect of making a few as presents is not too onerous. This is the finished piece and I have completed the lid with a little ceramic star which was just the right blend of lime and turquoise:


Have a look at the OTTBS page for a few more boxes made by group menbers, and links to other blogs

Sunday, 28 October 2012

Festina lente...

Or as it is sometimes translated 'Make haste slowly'!

I feel this year is running away with me a bit, with the clocks changing last night Winter seems to be here (ferocious hail yesterday to add to the feeling).

I have been steadily working on the bag but it is not growing very fast. I ordered a bulk of the green iris seed beads I need for the background, but the darn things havn't arrived so I need to tackle the company and or the postal service.


This is it in its entirety and considering how much I've done, there is still a way to go on it. BUT I still like it which is a plus! I have also got a couple of little things I can do for a rest when I need to, and these are needed by Christmas so I do have to get on with them...

If my BlogPosts die down a bit you know I'm busy beading instead though, I haven't given up on you all!

Sunday, 14 October 2012

bag blag blog

I am continuing to make bag progress, it is just a bit slower than I'd like! After a meal out on Friday night with the work colleagues I had a rich food induced, vivid dream of the completed bag, but alas, when I woke the bead elves (if such exist) had not done the work for me (boo!) I am happy with this bit I have done though, and slow and steady is probably better since I'm designing as I go.

Here is a picture of the work on the bag to give you an idea of the placement. What do you think? Too much? Too little? I know there is a large area to fill so I am fighting the urge to cover the whole thing with big blingy elements!


A bit  of a close-up:


Then I thought I'd divert myself with working the beaded ring for the handle/bag junction. I had a look at various beaded bead type designs including Nikia Angel's sparkly wheel, but decided to use this:


It is the Scheherezade Pendant from Sabine Lippert's Beaded Fantasies book, and was surprisingly quick to make: circular RAW in increasing bead sizes zipped into a donut shape then reinforced with netting. I'm pleased with my colours and will probably make another for a necklace if I can buy the metallic finish 4mm again (don't you hate when you get to the bottom of a pack of beads you know you haven't seen on sale anywhere lately?) If anyone has seen any, do let me know where they can be found!


Sunday, 7 October 2012

Just keep beading...

I've done a tiny bit more on the bag: this is the 'back' facing side with a lovely marquise shaped green goldstone cabochon from Designer Cabochons. I thought it was great in this position as 1) it is quite big, and therefore covers more space, and 2) it is a low profile cabochon so doesn't protrude too much. Having sewn a large Swarovski Navette to the front flap, I realised how dimensional parts of the embroidery will be, since the height of crystals can be significant (but compensated for by the depth of the facets and the reflections)


The bezel is backstitched rather than peyote, and I have used peel'n'stick for a firm connection to the foundation. I used light bronze size 8 beads (Miyuki 457L) and green iris 11s (Miyuki 468) for the securing rounds. A favourite 4mm Firepolish (copper lined olive) from Yashma looked good around this and then I found some green iris hex beads so used them for a bit of texture. The leaf beads have been in my stash a long time and are green metallic, and I broke out the good stash with some freshwater pearls from Raphael Beads, my local bead shop. I'm happy so far (but there is still a long way to go). I coloured the foundation with some marker pens as the painted colour still seemed too light and showed a lot. I think I'm trying to camouflage the area I still have to fill!

Anyway I will save the front flap of the bag for a later post, but it is also coming along, albeit slowly. 'Just keep beading...' is my mantra, hopefully I will get this completed within a year!

Sunday, 30 September 2012

Working on it!

'I'm (still) working on it' is my usual response to anyone who asks about 'that project you began in January etc...' Shameful eh? The one good thing is that I do usually resurrect said project so I can be at least slightly truthful when I say that!

People have been kindly enquiring about the health of my parrot embroidery and so rather than endure any Monty Python references I thought I should finish off the little bit of sky still remaining so I can at least once say I finished the embroidery part! Here he is and I'd like opinions on how to finish him off properly (I promise to try and do this in a timely fashion). My thoughts were to make a loose cover for a standard hardback week-to view pocket diary (so it could be transferred annually) but I'm not sure he'd be that hard wearing. Maybe a little frame would be a better option?. He is about 10cm x 5.5cm at the widest points, to give some idea. Other suggestions more than welcome!


I'd also like to show that I have made a start on my bag, although I may be shopping for more beads before long, as I think I might run out. I also need to work out how to attach the more pointy backed stones such as the emerald dentelles and metallic gold chatons I'd like to use. So far I have the Sahara navette and a green goldstone cabochon placed but not at all sure where to go next. Still this is the fun of bead embroidery, it seems to evolve!


We'll see how much progress I manage by the next time someone asks 'How's the bag coming along?' (Hint: the answer is at the top!)