Well we are nearly there, the Battle of the Beadsmith begins tomorrow and the next 8 weeks will be Beading Madness! I am not sure what the beading equivalent of girding one's loins is but I have cleared my table, assembled a good selection of seedbeads, stones, accent beads, pearls and crystals to help me on my way. Many of the other contestants seem to have been limbering up with some big projects, but I am worried that I'll burn out if I try and do too much... Here is my workstation, and I can tell you now it will not look like this for long. If you hear a distant rumble it will be me, being buried under an avalanche of beads etc!
The OTTBS group have formed a cheerleading team to encourage those members who are participating ( 9 at the moment) so thanks to them in advance for their efforts in keeping us motivated! I'd also like to thank my anonymous donors who have been sending me treasures to add to the battle stash, it means a lot to have so much generous support!
All the best to everyone taking part, I hope we all enjoy the reveals as much as last years and look forward to some superlative pieces. I am hoping to pull a rabbit from the hat and use the materials I have to make something really special, but only time will tell!
The only thing left to do is get a good night's sleep (although I might be too excited) ready for the starter's pistol!
Sunday, 31 March 2013
Tuesday, 26 February 2013
Excitements
A quick post to let you all know that I have been accepted as a participant in the second Battle of the Beadsmith. This is a Facebook based contest for 192 combatants from around the World. There is some stellar talent in that group and I am shaking in my shoes!!
I sent in photos of my 'Juno Moneta' as my 'audition piece' and made the cut. As it is a knockout contest I fully expect to make it no further than the first round, but I am so pleased and excited to have been selected that I can hardly speak (and those of you who know me will realise what that means!)
Anyway, my project for the contest will remain a closely guarded secret until the reveal in the Summer, and work cannot even be started until the 1st of April, but I am beginning to deliberate over possible designs and doing a lot of browsing for beads and other materials. If the posts become less frequent over the next months you will, I hope, bear with me.
In the meantime please have a look at the Battle page (clicking the logo at the right should take you to the page). You should be able to see a gallery album of last year's pieces. Sadly there is no webpage for the Battle so you need to be on Facebook to see the lovelies.
A final excitement for this post: my friend Janine made a lovely montage of the bead-it-forward squares the OTTBS group made for Bead&Button magazine's appeal, and it was featured on their FB page
Sunday, 17 February 2013
Singin' the Blues
Last year I challenged myself to use more pink in my work as I had got a little stuck in my (green) rut. I managed to find a palette of pinks with which I was happy, generally mixing in some brown or cream to prevent things getting too saccharine. This year (you guessed it) it is the turn of the blues. I actually have a reasonable stash of blue beads, but rarely use them, so it shouldn't mean buying more beads...except, well when you start looking there are some VERY pretty blue things out there!
I also decided to move into 3D with the bead embroidery, now I feel I have served my apprenticeship with flat pieces, and am moderately competent! I asked Renetha Williams Stanziano to make me a fish shaped form and she made this for me:
And look, he is BLUE! He isn't that big but when I started I realised that working on a form is quite different to working 2D.
I raided the local fabric store for buttons for eyes, and looked through my books and the internet for some inspiration. At around the same time I ordered some spike beads from Beads of Bohemia, and when they arrived I had the idea of making a longhorn cowfish, so the first beads were added...
The placement of the mouth went a bit wrong so I had to reposition, but soon I was off with the actual embroidery. I also made some beadwoven fins in (of course) herringbone stitch, using some of the new Rizo beads between the ribs. The pectoral fins worked well, but in the dorsal fin the Rizos flopped sideways so had to be reinforced, the fireline I used is exposed a little but I think it is better than hiding the Rizos under a lot of other beads. Here is the current status of my fish whom I have named 'Finnegan' after all the 'begin agin' I have had to do!
The main colour of beads will be blue but with the orange and lime accents he will be quite exotic! I still don't know if I will completely cover the surface in beads
And finally, the OTTBS blog colour challenge for February 2013 happened to be 'Blue and Brown' so I decided to use some more spikes, this time in milky turquoise, and made a modified version of Sabine Lippert's Scheherezade, which I'm calling 'Dunyazade' (the name of Scheherezade's little sister, to whom she told the 1001 nights' tales)
So the 'Blue' year is well under way!
Labels:
3D,
bead embroidery,
Blue,
fish form,
Rizo,
Sabine Lippert,
Spike bead
Saturday, 12 January 2013
Proud as a Peacock
I am pleased to announce that this week I finally finished my embroidered purse. I have named the piece 'Juno Moneta'. Juno, consort of Jupiter in the Roman Pantheon, is famously associated with peacocks and since I have made stylized 'feather' motifs using the oval and round cabochons I thought at once of naming the purse for her. Also it transpired that she was responsible for finances (holding the heavenly housekeeping money perhaps?) and that her temple was the location of the Mint where coins were struck. All in all an auspicious connection!
I have learnt a great deal from making this purse, and finally used some of my 'good stash' of crystals and beads. The main supplies are a mixture of Swarovski (Navette in Sahara, Comet d'Or flat backs, and various bicones, mini beads and cupchain); Dichroic glass cabochons by Helen Welch; Semi precious stones (Green Goldstone, African Green Opal, freshwater pearls); Czech firepolished beads (mostly 3mm and 4mm) and pressed glass leaves; and Japanese seed beads in sizes 6 to 15.
Initially I intended to use Miyuki 468 mid-green iris as the background colour for the filling in around the motifs, but finally decided on Miyuki 335, cranberry lined peridot AB. This looks less exciting in the tube, but picked up all the blues and purples as well as the greens of the other beads. Also, because of the outer colour being transparent, the textural patterns of the rows seemed accentuated. I am using more and more colour lined beads in my work, as they definitely add interest. I used the 468 in the feathers instead where it looks lovely alongside metallic bronze. A late arrival in my palette was Miyuki 1017, a silver lined emerald AB, which now replaces the Matsuno version which I loved for its colour, but which was a little larger than the Miyuki 11s. I was sparing with this as the silver lining tends to dominate.
Many of the beads used in this project have been the gift of other beaders from around the world and the whole project has a lot of emotional connection for me. I am truly grateful for the gifts even if they were only words of encouragement, which gave me confidence to persevere with my own creative urge! I am proud as one of Juno's peacocks that I managed to do it!
Thanks to all who made this possible, and in the spirit of beady co-operation, I would be happy to answer any questions from anyone thinking of embarking on a similar project...
![]() |
| The completed embroidery just before attaching to the bag. The unembroidered edge was trimmed once I was sure it fitted |
I have learnt a great deal from making this purse, and finally used some of my 'good stash' of crystals and beads. The main supplies are a mixture of Swarovski (Navette in Sahara, Comet d'Or flat backs, and various bicones, mini beads and cupchain); Dichroic glass cabochons by Helen Welch; Semi precious stones (Green Goldstone, African Green Opal, freshwater pearls); Czech firepolished beads (mostly 3mm and 4mm) and pressed glass leaves; and Japanese seed beads in sizes 6 to 15.
![]() |
| Front of bag |
![]() |
| Reverse of bag |
Initially I intended to use Miyuki 468 mid-green iris as the background colour for the filling in around the motifs, but finally decided on Miyuki 335, cranberry lined peridot AB. This looks less exciting in the tube, but picked up all the blues and purples as well as the greens of the other beads. Also, because of the outer colour being transparent, the textural patterns of the rows seemed accentuated. I am using more and more colour lined beads in my work, as they definitely add interest. I used the 468 in the feathers instead where it looks lovely alongside metallic bronze. A late arrival in my palette was Miyuki 1017, a silver lined emerald AB, which now replaces the Matsuno version which I loved for its colour, but which was a little larger than the Miyuki 11s. I was sparing with this as the silver lining tends to dominate.
Many of the beads used in this project have been the gift of other beaders from around the world and the whole project has a lot of emotional connection for me. I am truly grateful for the gifts even if they were only words of encouragement, which gave me confidence to persevere with my own creative urge! I am proud as one of Juno's peacocks that I managed to do it!
Thanks to all who made this possible, and in the spirit of beady co-operation, I would be happy to answer any questions from anyone thinking of embarking on a similar project...
Saturday, 29 December 2012
Sugar Rush!
Well this is nearly the end of the year, so time for just one more blog post...
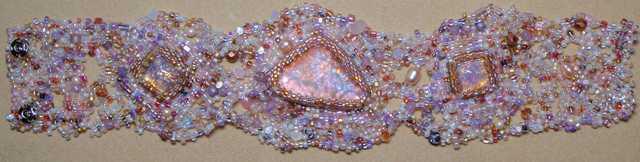
Just before Christmas, I thought I was pretty much beaded out, from making gifts and items for fairs...Then Nancy Dale produced a Christmas Cracker of a tutorial for an embroidered/freeform cuff, and I couldn't resist! Immediately the pdf landed in my inbox, I was mixing soup and selecting focals, I chose a lovely piece of etched dichroic glass which looked like opal, by Silvermoonlyn as the central item and this is the soup mix:
I also had a couple of vintage glass square cabs with an opal effect so they became the secondary focals, and I began by fixing them to some of Nicole's bead backing in pink. The bead embroidery extends a little way, to allow the anchoring of freeform.
Bezelling the squares was a bit tricky and I fudged the first one, but the second worked better and I got everything connected. I then raced away with the freeforming, and by Christmas Eve I was finished (although I might add more dimension later).
I named the piece 'Kingdom of Sweets' after the fantasy land in the Nutcracker ballet, the colours were sugary pinks and lilacs for the most part with the odd accent in copper and orange. I was pleased with the overall shape which is reminiscent of a wrapped candy or a cracker, all consistent with the confectionery theme.
I recommend the 'Atlantis Cuff' tutorial to anyone who would like to try freeform peyote/RAW. It was a lot of fun to make, and although every piece will be different, there is plenty of guidance and support to help you achieve a satisfying end result!
Thank you for reading and commenting over the last year! Hoping you all have a happy and healthy new year 2013!
Sunday, 9 December 2012
Beading-it-forward
So sorry for neglecting you all this month (and last) I thought I'd just update you on some beady happenings, so you won't worry that I have given up...
I have been making squares for the Bead&Button magazine Bead-it-Forward appeal in aid of breast cancer research. Having had a scare earlier in the year, and knowing several families affected by the disease I was keen to join in and in a fit of enthusiasm cut about 25 squares of beading foundation to the prescribed size. Of course I didn't manage to complete 25 squares, but through the OTTBS facebook group effort I passed on the spare cut squares to other beaders who didn't have the foundation.
We had made contact with the associate-editor in charge of the project and she had said that provided all squares were submitted together they could be combined into a single quilt so that the group's efforts could be auctioned as one! At the present time we have over 80 squares between us. I have just sent off the 12 I have managed (not all perfect in my eyes, but all good experiments) to our coordinator in the US Janine, and we hope to collect all our groups' together by January, although the deadline is not until March.
I have been so impressed by the effort put in by inexperienced novice beaders and experts alike, and would like to encourage every beader to have a go! In order to help with inspiration, there are a number of free charts on the magazine page.
Anyway here is my 'set' all together
Otherwise, most of my bead efforts need to stay 'under wraps' until the recipients see them, being either gifts or 'Round Robin' embroidery projects, which will be revealed only when every square in the group has completed the circuit. Our group has participants in the US, UK and Australia, so it is likely to take a while... I'm on my 3rd square now, but will need to work on two others in the future, as they appear in the post!
Tuesday, 6 November 2012
OTTBS Bead Book Bounce: Little Bead Boxes by Julia S. Pretl
The third OTTBS Bead Book Bounce (and the second in which I've participated) features Julia S. Pretl's Little Bead Boxes. I bought this book after seeing the dedication in Diane Fitzgerald's Shaped Beadwork, but other than looking at the pictures had barely touched it. I decided to attempt at least one of the projects in the book, and possibly more if I could for Christmas presents for close family this year.
Although the book patterns begin with a triangular box, the one I really liked was 'Star' which is pentagonal.
I had no real problems with the base of the box, working in 4 colours of delicas, and following the word chart and the graphed design. It may seem odd to some that the word chart always starts at a corner, when due to stepping up, the point at which you actually begin a row varies, but once you are used to it it seems straightforward enough. The increase cycle section for pentagonal bases helps to clarify so is worth sticking a marker in.
My shaping at the top of the box was also trouble free, but I hit a snag at the hem round one (and I really needed the bookmark in the hem instruction page) I managed to break a bead in the corner of the row from which the hem begins so had to unravel right back to the beginning of the inner column. The 6lb fireline ended up like frayed Nymo!
My top tip here is to cut the thread if you are going to unpick more than a side, fasten it off and begin a fresh thread length from the problem point. Switching to a thinner needle and 4lb test for the 4 hem rows and the last two body rows and the zipping up, was also beneficial, although by the time I did the lid hem, I was comfortable with 6lb and a size 10 needle.
The box took me about a week to make so the prospect of making a few as presents is not too onerous. This is the finished piece and I have completed the lid with a little ceramic star which was just the right blend of lime and turquoise:
Have a look at the OTTBS page for a few more boxes made by group menbers, and links to other blogs
Labels:
beaded box,
Julia Pretl,
OTTBS Bead Book Bounce,
peyote
Subscribe to:
Posts (Atom)