Sunday 30 September 2012

Working on it!

'I'm (still) working on it' is my usual response to anyone who asks about 'that project you began in January etc...' Shameful eh? The one good thing is that I do usually resurrect said project so I can be at least slightly truthful when I say that!

People have been kindly enquiring about the health of my parrot embroidery and so rather than endure any Monty Python references I thought I should finish off the little bit of sky still remaining so I can at least once say I finished the embroidery part! Here he is and I'd like opinions on how to finish him off properly (I promise to try and do this in a timely fashion). My thoughts were to make a loose cover for a standard hardback week-to view pocket diary (so it could be transferred annually) but I'm not sure he'd be that hard wearing. Maybe a little frame would be a better option?. He is about 10cm x 5.5cm at the widest points, to give some idea. Other suggestions more than welcome!


I'd also like to show that I have made a start on my bag, although I may be shopping for more beads before long, as I think I might run out. I also need to work out how to attach the more pointy backed stones such as the emerald dentelles and metallic gold chatons I'd like to use. So far I have the Sahara navette and a green goldstone cabochon placed but not at all sure where to go next. Still this is the fun of bead embroidery, it seems to evolve!


We'll see how much progress I manage by the next time someone asks 'How's the bag coming along?' (Hint: the answer is at the top!)

Sunday 23 September 2012

Bag Lady

This week I did something extremely alien, to me at least! I bought an evening purse! I do not carry a handbag or purse most of the time, relying on pockets/carrierbags/a rather old satchel-type bag for all the bits and bobs of everyday life. Also I do not have a social life which requires any kind of dressing up, so an EVENING PURSE!! Really quite odd behaviour...

The reason for this crazy purchase is that I have ogled beautiful hand beaded bags almost all my life. My Grandmother's neighbour (the terrifying district nurse, who had a heart of gold in a crusty exterior) gave me a bead embroidered bag when I was about 4 years old, with angel fish swimming around. I later took scissors to it to recycle the beads when I had snagged it a few too many times and broken the catch, these seed beads were among the first I ever used for weaving.

Anyway, I decided, when I began bead embroidery, that a future project would have to be a purse, and lately I've seen several using a purchased bag as the base. The Bad Liz (Liz Thompson) has a few lovely examples on the Bead Embroidery Forever Facebook group. This little purse seemed just the thing to try the technique:


 I could see the embroidery being made as a long strip which would wrap around the bag with a hole for the wrist strap and  the catch, so I made a paper template (using baking parchment, see picture) and then traced this onto vilene (interfacing). I'm not sure what colour beads I'll use so I painted the vilene a kind of dull brown on the basis that it will blend with most things. The paint I used was an acrylic liquid used by the boys in my family for model painting. I diluted it well and applied it to dampened fabric, as I saw this done by Angela Massey of Sharp Tomato at a bead fair and it doesn't seem to affect the 'needling' of the foundation as long as it isn't too thickly applied.

Now to choose some bits from my stash to use as focals...

Monday 17 September 2012

Beading Babes Project 6 Reveal

I decided to join in the Beading Babes Project 6 beadalong which offered several enticing projects. Because the initial reveal date was beginning of September, I thought I'd best not bite off more than I could chew and opted to do just one of the projects, Ripple Cuff by Sherry Serafini from the June/July 2011 issue of beadwork . I enjoy bead embroidery but my approach to design is pretty random so the idea of following a pattern for an embroidered piece was intriguing.

As a centre focal I selected this green/fuchsia Czech glass dragonfly button, which I  backfilled with interfacing donut shapes to accommodate the shank. I chose green iris, fuchsia, gold metallic and purple iris size 15s to match. Having attached it to the foundation and worked the bezel in delicas and size 15 beads, I  already decided to deviate from the pattern by using a cuff blank instead of a clasp. The button was 31mm diameter and it was obvious that I'd have more rows of  'ripples' to do to cover the area of a 5cm cuff blank. I then discovered that I really don't like doing repetitive fills in bead embroidery, and that it is hard to get them to be nice and round.


 Perseverance is my middle name (not really!) so I completed the three rows of the original pattern and extended them up round the edge of the centrepiece. At that point I decided enough of a good thing is a feast! I went into a 'fill the space any which way' mode and found some higher metallic Toho size 11s to round off the ends. Due to the rather large finished size I decided to forgo the drop edging in favour of purple iris size 8s brickstitched to the covered form, I also had to add a further row of charlottes to the bezel as the focal wanted to pop out.

Here is the more-or-less completed embroidery (but it is very hard to show the fuchsia flash of the button):


And this is the final product:


The only thing I wasn't happy with was the white foundation, this would have looked way better on a green or purple backing, but following a disastrous attempt to colour the gaps between the beads I decided to let well alone  (I had to take a cotton bud with alcohol to clean up the pearls!)

I'd just like to encourage you all to take a look at the other Beading Babes Blogs, find your way to the facebook group if you'd like to join the next projects, and if you visit Karyn Healy-White's blog  (Releases by Rufydoof) you will find more info!


Wednesday 5 September 2012

Bead, Book & Bounce blog hop: Lisa Kan's Bead Romantique

This is the first Operation: Tackle That Bead Stash 'Bead, Book & Bounce' blog hop. The book -'Bead Romantique' by Lisa Kan (Interweave Press, 2007)- was chosen following a poll of members to see which books we had in our libraries. We then had the option of joining in by making a project (any) from the book, or another project from the same author in a magazine or on-line. We then were asked to write a mini review on our experiences with the project.

Without further ado I'd like to share this project by Lisa Kan 'Petit Fiore'

The project is not in the book, but was published in Beadwork Magazine 2008, I thought I'd like to give it a try as it is very pretty. The base is lovely, modified right angle weave in 15s and 11s, and also charlottes (size15) I looked at the pattern and although the instructions didn't specify, decided that Japanese charlottes would be best in this. I'm glad I did as the design requires several passes in the base and Czech charlottes would have been murder. Then you move on to the embellishment layer. This was where I had problems, the flowers are multi-layers of picots/loops, with a Margarita set atop the centre. According to the instructions it is added after the initial round of petals, but I found it then got in the way of subsequent rounds of picots. The second flower I made was done differently, by adding the Margarita after the loops and I felt this worked slightly better. For me, this might have been easier had the 'common beads' been a different colour to help locate them. I don't think they would show much (if at all). When I get round to the next flower I shall give it a try and see. I am going to finish this, but it is definitely a project for 'fresh eyes' or maybe just younger ones, not for a doing at night, after work, with a headache!


My top tips for this are:
1) Get good quality size 15 beads and Japanese 15 Charlottes
2) Change to a finer needle for the flowers, the base is quite firm and will not accomodate a thicker one.
3) Use 4lb test fireline for the embellishment layer for the same reason. It doesn't matter so much in the base.

I would not say this is an easy project for a beginning beader, but this is mostly down to the small beads, and tight corners. An intermediate beader would enjoy the challenge, and would be able to make adaptations as I have done. The idiosyncrasies of Beadwork magazine's hand drawn diagrams makes them slightly confusing but with the written instructions it is easy to work out.

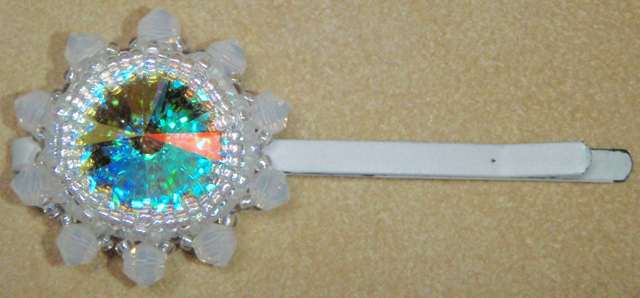
Lisa's book was already on my shelf and I have previously used the netting bezel on Rivolis for little Hair ornaments. I added some 4mm bicones in the 'gaps' of the netting.


I still aspire to making some of the other projects when finances allow (some of them do require a large number of Swarovski/Czech firepolish/freshwater pearls!) The next on my list is Quatrefoil Renaissance bracelet, if I can find the right sized brass filigrees, as I think I have the other components.


Have a look over on OTTBS for other blogspots with this book for inspiration